Web App Caching with Varnish Cache
You've decided to distribute your web app closer to your users for increased performance. Why not make it even faster by leveraging caching? In this tutorial we will use Varnish Cache to enable caching for your container running a Webapp. You can learn all about Varnish from their own documentation or from our comprehensive guide.
The pattern we'll demonstrate is beneficial for use cases such as the following:
- The web app uses a Server Side Rendering framework.
- The web app is a multi-page static site.
- The web app is a Single Page App.
In all cases, you'll put less load on the web app container by putting Varnish Cache in front.

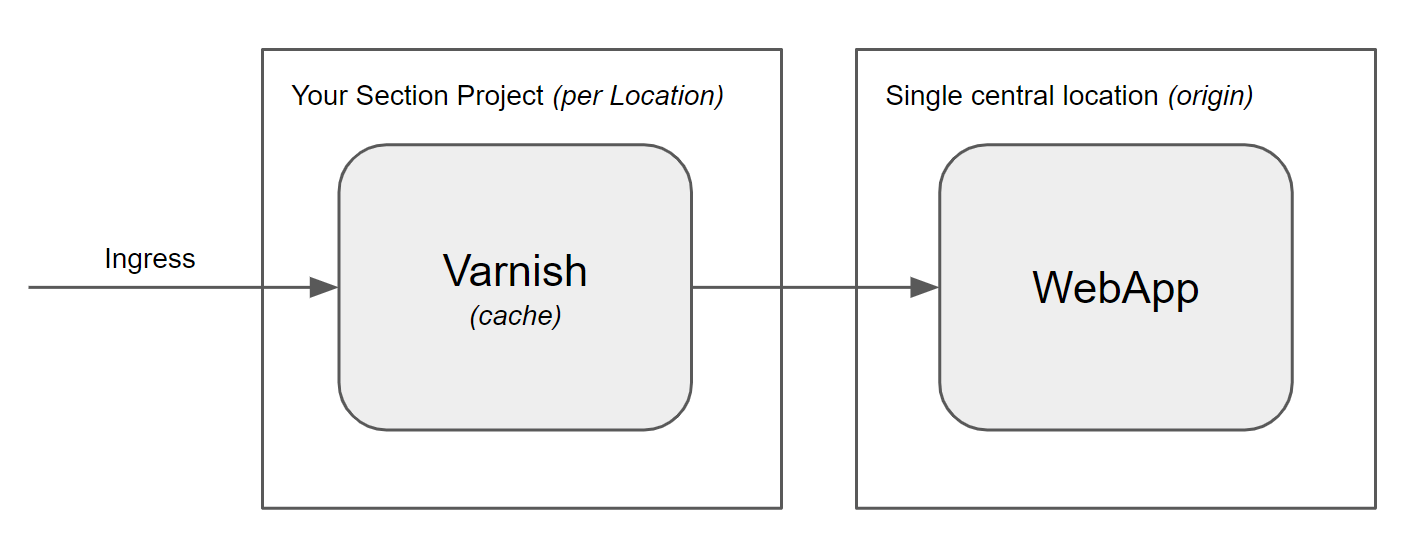
The above diagram illustrates the case where Varnish and the WebApp are deployed together on CloudFlow.
The pattern also works when the app is centrally located in a single location, in which case you've instantly built a modern CDN for a web app. If you are using a static site generator like Next.js, Hugo, Gatsby, Jekyll, etc., then you absolutely need to put a CDN in front of it. And by using CloudFlow for your CDN, you'll get CloudFlow's enhanced security, plus you can customize your CDN with components of your choice, such as WAFs, image optimization, bot mitigation, and more.
In addition to Varnish Cache, this tutorial introduces the use of Kustomize, a technology for keeping your "kustomizations" separate from generic YAML templates, and NATS, a cloud and edge native messaging system.
Traffic flow diagram
Client requests example-domain.section.app (when it has not been cached)
example-domain.section.app
└─> CloudFlow's managed public ingress
    └─> Varnish Cache
        └─> App
Once the page has been cached, the response will be returned by Varnish Cache, which reduces the load on the app itself
example-domain.section.app
└─> CloudFlow's managed public ingress
    └─> Varnish Cache
        └x App
We will be deploying the resources via kubectl, and leveraging Kustomize's configMapGenerator to convert configuration files (Varnish Cache's default.vcl) into a Kubernetes ConfigMap resource. We're using a demo image from CloudFlow for the 'app', but you can swap out the container image for one that you prefer.
This tutorial assumes that the reader has a basic understanding of the Varnish Cache configuration language, and so will simply gloss over the default.vcl file. You may refer to the official Varnish Cache documentation for more details.
note
Before starting, create a new CloudFlow Project and then delete the default Deployment and ingress-upstream Service to prepare the project for your new deployment.
Project structure
We show you how to pull the pieces together here. The entire project is available by cloning from CloudFlow's GitHub repo: https://github.com/section/varnish-tutorial. It uses the CloudFlow Varnish Cache container on Docker Hub.
The folder structure will be as follows:
.
├── app
│   ├── kustomization.yaml
│   ├── webapp-deployment.yaml
│   └── webapp-service.yaml
├── varnish
│   ├── default.vcl
│   ├── kustomization.yaml
│   ├── varnish-deployment.yaml
│   └── varnish-service.yaml
└── kustomization.yaml

2 directories, 8 files
This tutorial will result in the creation of the following Kubernetes resources in your CloudFlow Project:
- 2 Deployments
- 2 Services
- 1 ConfigMap
Root 'kustomization.yaml'
This lists the resources/folders to be deployed when the kubectl apply -k . is run. The following code will deploy the resources declared within the varnish and app folders.
resources:
- varnish/
- app/
Folder 'app'
This is where you would declare your app that sits after Varnish Cache. Depending on your Varnish Cache configuration, the returned responses will then be cached by Varnish Cache.
resources:
- webapp-deployment.yaml
- webapp-service.yaml
Folder 'varnish'
This is where you would configure the Varnish deployment, such as resource allocation and number of replicas. Kustomize's configMapGenerator takes care of converting the default.vcl file into a configmap. If the configmap is updated, the Varnish pods will be restarted to take on the new settings.
resources:
- varnish-deployment.yaml
- varnish-service.yaml

configMapGenerator:
- name: vcl
  files:
  - default.vcl
vcl 4.1;
import dynamic;
backend default none;

sub vcl_init {
    new d = dynamic.director(port = "80", ttl = 60s);
}

## Redirect http to https
sub vcl_recv {
    if (req.http.X-Forwarded-Proto !~ "(?i)https") {
        return (synth(10301, "Moved Permanently"));
    }
}
sub vcl_synth {
    if (resp.status == 10301) {
        set resp.status = 301;
        set resp.http.Location = "https://" + req.http.host + req.url;
        return(deliver);
    }
}
## End redirect http to https

sub vcl_recv {
    set req.backend_hint = d.backend("webapp-service"); # Replace this value with the name of the service linked to your app
    return (hash);
}

sub vcl_backend_response {
    set beresp.ttl = 600s;
    unset beresp.http.set-cookie;
    return (deliver);
}

sub vcl_deliver {
    if (obj.hits > 0) {
        set resp.http.Varnish-Cache = "HIT";
    } else {
        set resp.http.Varnish-Cache = "MISS";
    }
}

sub vcl_hash {
    hash_data(req.http.X-Forwarded-Proto);
}
Deploying the resources
Assuming you've configured the folder in accordance to the instructions above, you can deploy all the resources by running the following command from the project root folder:
kubectl apply -k .
You can review the resources after creation by running the following command:
kubectl get pods,deployment,service,configmap -o wide
Issuing Varnish Cache Bans
Banning is a concept in Varnish Cache that allows expression-based cache invalidation. We give two approaches, one that works for infrequent bans, and the other that works better when bans are the result of automation.
Low frequency bans
Bans can be issued to all Varnish Cache pods deployed in your project worldwide by using kubectl exec as shown below. Note that this method is not suitable for more than a few bans per minute.
BAN_EXPRESSION="req.url ~ /path/to/ban"

kubectl get pod --selector app=varnish-cache -o name \
  | xargs -t -I{} kubectl exec {} -- varnishadm ban $BAN_EXPRESSION
High frequency bans
For high frequency bans, our Varnish Cache container has been programmed to be able to receive messages from the CNCF NATS cloud and edge native messaging system. You can provision your own instance of NATS. Or you can leverage a managed offering such as Synadia, a distributed instance of NATS that will work well with your distributed CloudFlow project.
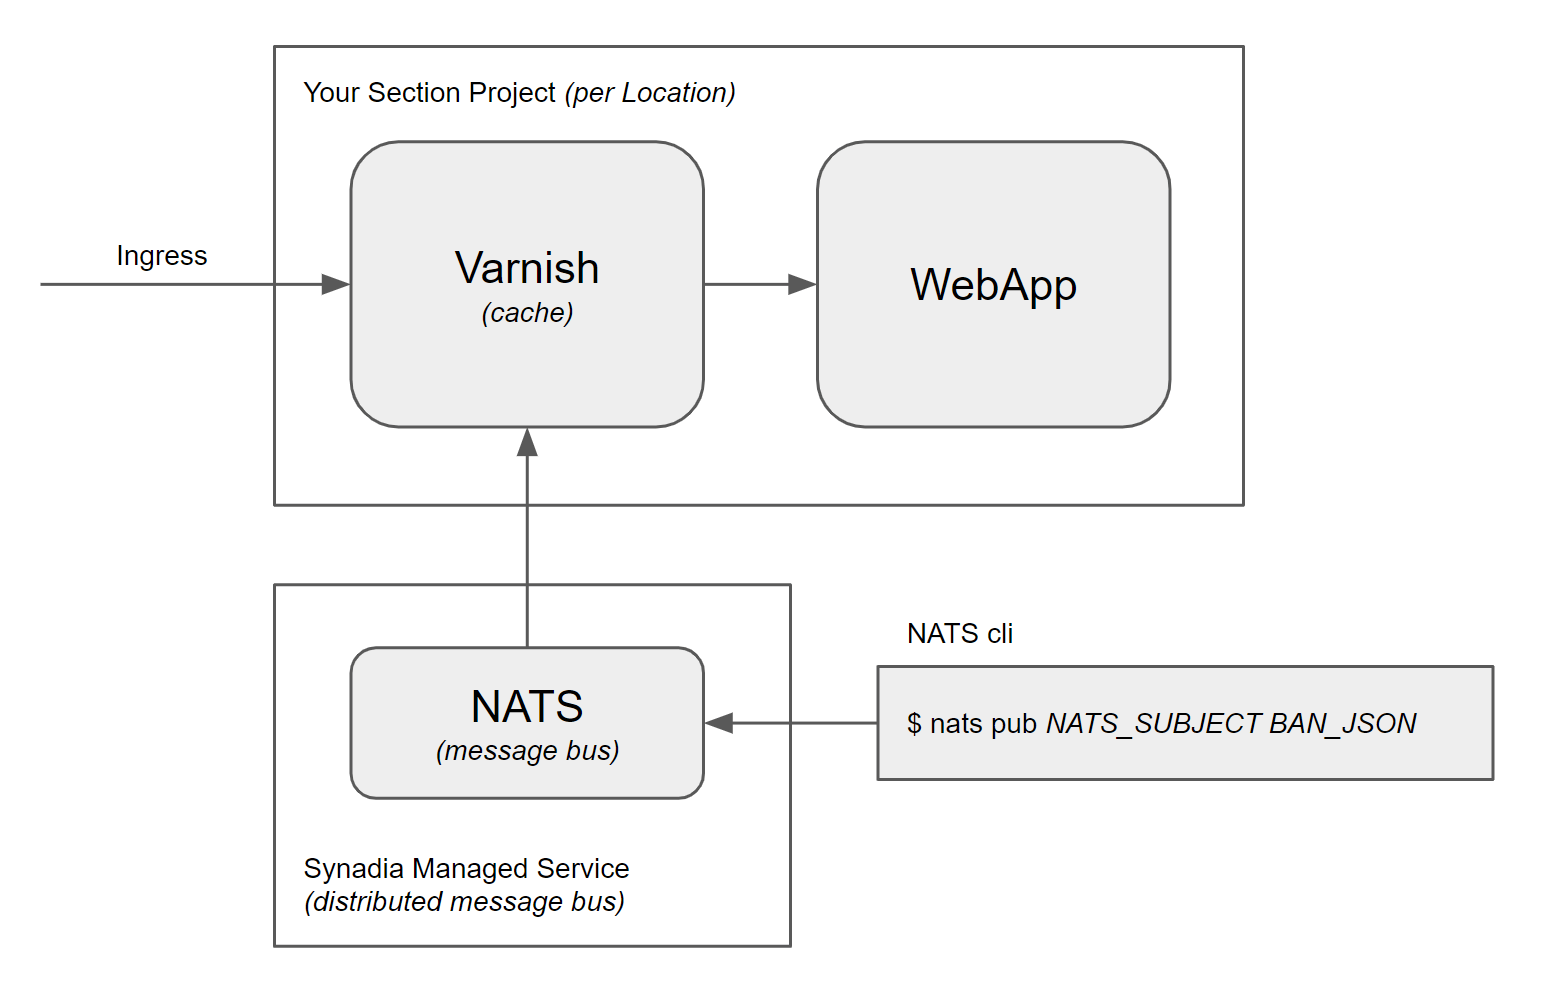
The NATS_URL and NATS_SUBJECT environment variables within the varnish-cache deployment (varnish-deployment.yaml) specify a NATS server, and a NATS subject respectively where a Golang-implemented process in the Pod will subscribe to receive Varnish Cache ban messages via NATS. The NATS cli is illustrated, but you can use any mechanism you like to get messages onto the message bus.
The messages in NATS are expected to be JSON-encoded and use the structure from the following example, where banExpression is any valid expression that would be accepted by the varnishadm ban command.
{
  "operation": "applyban",
  "parameters": {
    "banExpression": "req.url ~ /foo"
  }
}